990...Still Not Running Update Part 1
- Chasbo
- May 15, 2020
- 5 min read
Do I even work on this thing anymore? Did I give up and call a junk yard? Am I perpetually lazy and unmotivated. One of those things is sort of true. I am perpetually lazy, but I am working on the bike, just not this blog. There were lots of little jobs I have been working on over the last couple of weeks as I waited for parts to show up for my last couple of big jobs. Between all that, family life and work, I haven't been as good about updating this blog. No problem...let's do a giant blog catch up. This is Part 1 of that. So, last time I had managed to do my valve checks, among some other jobs and sufered the righteous anger of El Pollo Grande. That's my wife's nickname. I gave her that nickname one day after she had a wife fit. This is her. A modern crime fighter that knows it all and isn't afraid to show it.

I made that...stunning, isn't it? She gets mad when I tell people about it, then again she shaved my head in a fit of anger, so this works for me. And in case ya'll are thinking that I'm an ass, I am, but I made myself as her sidekick, El Gordo Estupido.

I stole the art from Stephan Pastis of Pearls Before Swine fame. He will probably sue me now.
Anyhow, where was I....yes, a monster blog update. So, bald and beautiful, I set upon the beast once more. First job up was double checking my valve job. I told ya'll I couldn't help myself. I'm glad I did. Somewhere along the line I forgot to write down the clearances when I was done. So back in I went and got the numbers. This time the job was even easier without the dirt. Just a quick double check and recording of the clearances as they sit now. After that I jumped on installing the new cooling hoses. So, first thing is to make sure I put all the right hoses in the right spots with the correct clamps. The old hoses had been removed awhile back, so now I sat down and played with everything. First, I laid everything out and set about removing the remaining clamps. I have to do this in two parts to fit the whole shebang onto the engine inside the frame. There is the thermostat side and the chain side.

The clamps pull right apart nice and easy


Everything apart and ready for cleaning and new hoses.

With the two sides split apart, I removed the old hoses and cleaned the plastic tubing tubing up before install a new hose and clamp. I didn't tighten any of the clamps right off since i want to make sure everything fits right.

Then I cleaned the connections on the engine with some white vinegar and a scotchbrite pad to remove the build up.

Shiny

After that, I installed both sides and started tightening all the clamps

Then I made a huge mistake without realizing it. I tightened all the engine clamps before realizing that there was one clamp my parallel cutters couldn't reach. It's the clamp at the lower right in this picture.

I tried using some side cutters, but they don't pull the clamp evenly and I was worried that it would end up leaking at some point. After puzzling things over and trying to come up with a clever workaround, I finally decided that I needed to get some more clamps and just do it right. Bummer....I removed the two clamps that held the thermostat side in place and pulled that off and went inside to make another parts order....will it be the last? Nope, I am writing this up two weeks later and have made two other parts orders since then...So, that was it for the day. Onwards.........
A couple of days later, it was time to do something else...Remove the rest of the old graphics kit. But first, a sad story. I had been working with a guy in England on a new custom set, but he decided to shelve all custom orders and only do stock setups. I didn't care for his regular designs, so it was time to find someone new. There was another guy in England that was pretty well known among the 950/990 crowd for doing good work, but he was also unwilling to do anything custom during the ongoing pandemic. Lucky for me though, I dig his stock designs, so after doing a little thinking on it, I decided on a Dakar themed kit he does and this is it.

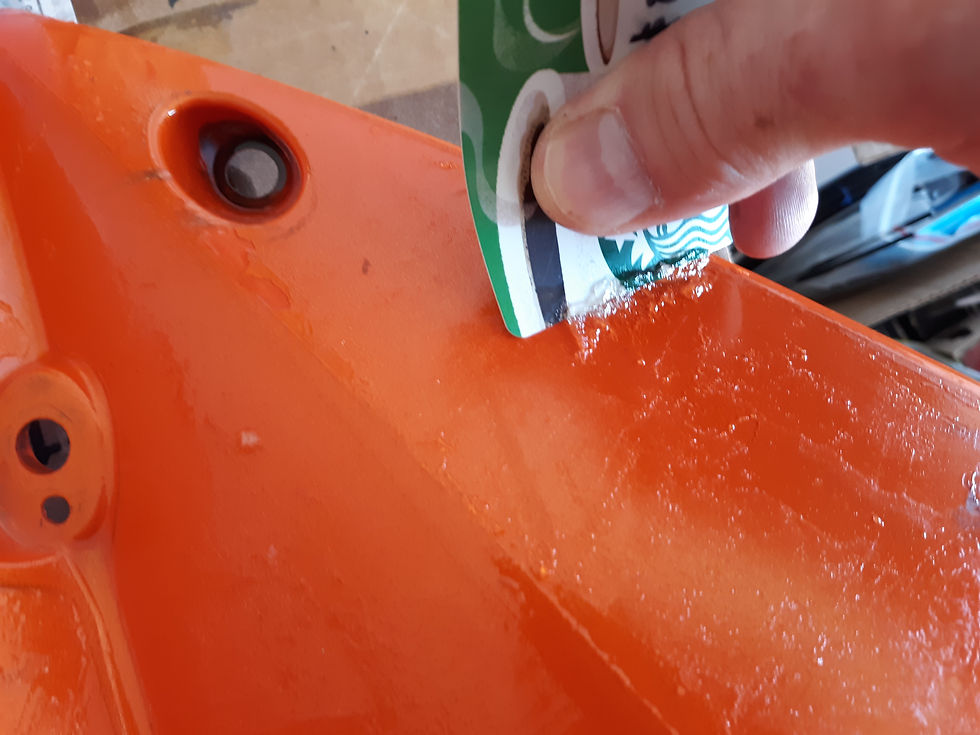
It was more expensive, but I really dig the whole design, so I threw the guy some cash. I feel pretty safe since I have no hair for El Pollo Grande to cut off and I've made sure to stock up on all her favorite drinks. Between that and cooking her good dinners, I will probably be safe. Just the same, I'm sleeping in the guest room (it's what I call the garage) for a few weeks. The next thing she cuts off could be more important. So, into the garage I went with sticker goo remover, scrapers, paper towels and a desire to finish something. The old stickers came off easy enough, although they took a fair bit of paint with them.


I guess I didn't really need that paint...

I also removed the old heat shield goo.

Assembly line


I hope the missing paint on the tank won't cause a bubble to form under the new sticker.

This stuff kicks ass on sticker goo. The old store cards are what I'm using as scrapers.


The sticker remover leaves an oily residue, so all the parts got another good scrubbing.


Then I put it all away until the next day to allow everything to dry.
And so, the next day eventually came a couple days later and I got back on it. So, there is another heat shield on the right side tank that had deteriorated that needed to be replaced, so I needed to remove what was left of it as well as the sicker goo I had missed on some of the body panels my first go around.
That is the remainder of an old heat shield.

Getting there...

Good enough...

Then it was onto cleaning the remainder of the leftover goo off these parts as well as time to clean out my radiator overflow, the colling fans and clean the exhaust up with some scotchbrite.


That is a ton better.
I went ahead and installed a new headlight harness that I got for the project. Clay had added an extra wire to power a set of auxilliary lights which I will replicate once I manage to score some extra lights down the road. I wanted a boot for the headlamp to cut down on some of the dirt that had been finding a way into the light.


That makes me happier. So, then I decided to refresh the good front turn signal, the left side was broken and I ordered a replacement for it, but decided to just clean up the right fron signal as I had the rear signals. It was really dirty.

and then, like magic, it was clean. I replaced the lens since the old one was pretty scratched up. I'm happy enough with the results to call it good.

Then, to set myself up for the next days work, I removed the fuel pump. I will be changing the filters on it next. Four 8mm bolts hold it on. First thing I noticed was that the hose is really dry rotted. No biggie, that's easy enough to replace.

That was good enough for the day, so I zipped things up and called it a night. Up next is the fuel pump and other assorted jobs. I'm rolling along even when I don't post stuff and can almost see light at the end of the tunnel. Until next time, adios amigos....
Comments